
expansion of objects, 3D - Mr Jeffrey
This time we learnt something completely new and different! instead of going the old way of 2d images and photographs to sketches, we learnt to actually make objects and images more 3d! Heres how we did.
First off i went to the Objects tool under the Text tool and made a simple 2D square shape. Then i went to Effects > 3D > Extrude & Bevel... Here i played around with the dept and also added perspective as seen below (:

After this, you realise that you can't really do much with it, more like an expanded 2D object. What we did then was we went to Object > Expand Appearance and then ungroup [command + Shift + G] on the mac.

This literally ungroups all the faces of the square whereby you can now actually pull apart the box!

You can close your mouth anytime now. (;
NEXT
Done a little star gazing lately? well its your luck.
We drew two stars, preferably one different from the other and both in neon glow from the neon effects menu from graphic styles in window!

After this we go to the object menu > Blend > Make
This gives your stars a special inception effect!

..if not yet then you may have to go to Blending options, Change spacing to specified steps and adjust the number upto to 120 or so and see the magic.


An amazing piece of art yet again, but becareful not to add too much to your spacing if not your piece may end up looking alot like the one below, there are colours but too little amount of space to actually enjoy the view with.

And now ladies and gentle men, the grand finale of todays show, 3D Magic!
FIRST OF ALL, i drew a simple yet so intricate of a line using the pen tool.
Not forgetting to save my work often. As you can see o the top right here, i drew a little curve.


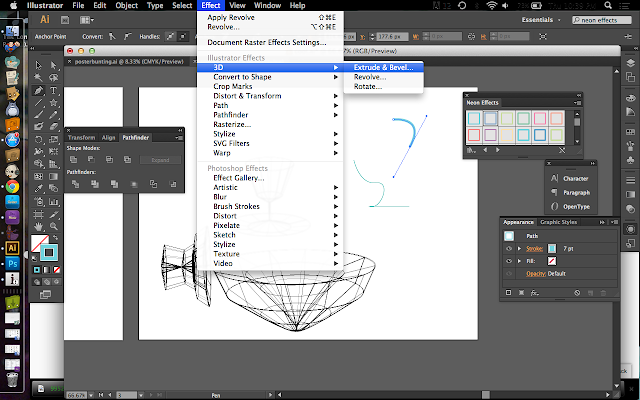


you should get this pop up shown below..
Just like the Extrude & Bevel but if poses as a different function. this doesnt bring out the object but instead it makes a pattern going around 360 degrees using just one of the lines that you had drawn!


Not forgetting to save my work often. As you can see o the top right here, i drew a little curve.

..Then highlighted it neon blue because so can you.
Now heres where the magic comes in.

Go to Effects while your line is still selected, 3D > Revolve > Extrude & Bevel

This allows you to extract or expand the object and give it a sort of depth!
As you can see on the top right, here, i even added depth so the object can be seen like its being stretched ever so simply.


..here are some screencaps of a rotation being done to show that that square on the right can be rotated in place of your object to see which direction it would be facing.

AND THE MAGIC CONTINUES
Do the same except go to Revolve this time, now revolve this time (;

Just like the Extrude & Bevel but if poses as a different function. this doesnt bring out the object but instead it makes a pattern going around 360 degrees using just one of the lines that you had drawn!

If you can see the little selection towards the bottom written "from - [left edge]" change it to "right" and this what you would see [below] (;


FIN. (:
No comments:
Post a Comment